
Two weeks have passed, and I've busted some serious butt around here. Console table, nightstands, euro shams, lumbar pillows, primed guestroom, three and a half painted interior doors, planted a couple gardenias with liriope muscari (hopefully its the big blue version...) to replace those sad terracotta pots, and made another batch of homemade laundry detergent. Finally I feel like things are coming together around here.
Now onto the console table reveal - mini drum roll please..........

You know those times when you have something in your head for a project, you are thrilled to start it, and then at the end after a few broken nails, banging your thumb with a hammer, screaming bloody murder, and being covered in paint or stain {still slightly high from the fumes} you are completely disappointed? I'm so beyond ecstatic that this is NOT one of those times. There's been a few of those lately, and I needed something to keep me going. While I do like the whole trendy chevron pattern I did not want the table to be something I'd be over with next year, so I kept it tone-on-tone rather than a dramatic contrast (like on my black and white pillows), and I also radiated the pattern out from the center rather than keeping it consistently one direction from side-to-side. The gray scale stain is the right fit for my family room, but I think it would look incredible in more traditional wood stains as well.
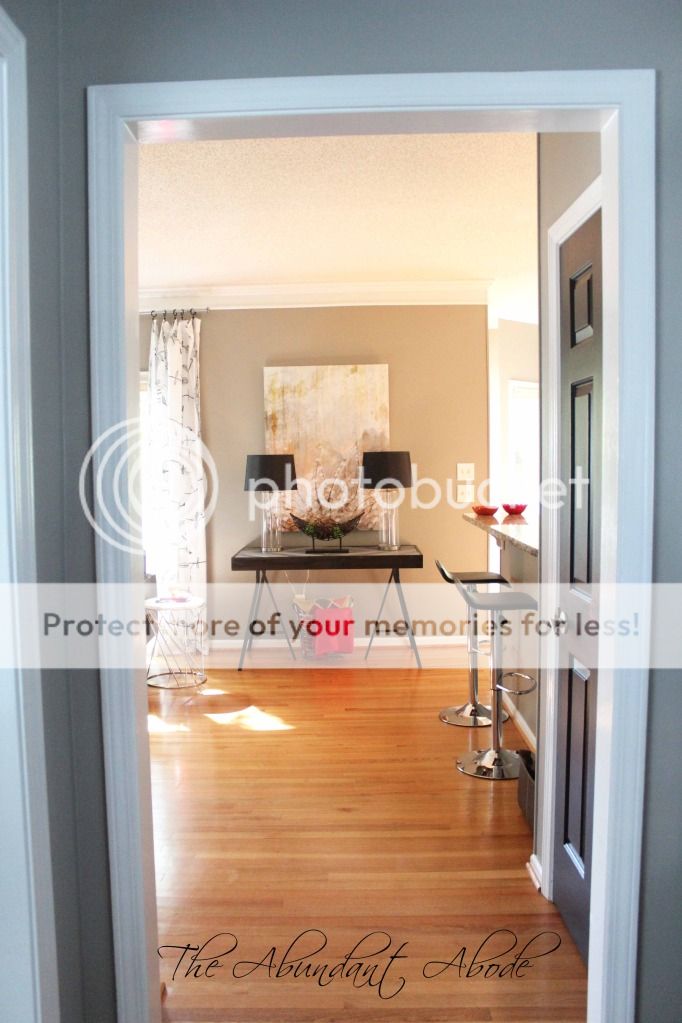 |
| View From Foyer |
What I really want under the table is something like this cute little stool from CB2 or maybe those fun gilded stumps from Phillips Collection. Maybe later...we still don't have a breakfast table, so most of the stylizing will have to slowly build over time. I believe a more realistic "lived-in" look is created that way any how, so I am attempting to learn to love all the unfinished opportunities.
The bases are the metal desk bases from Ikea - $10 each. Some of the wood was left over from the bathroom mirror project and then I bought a few more boards to complete it. I also used a precut 24x48 MDF board. Starting with the dimensions of the MDF board, I drew up a plan with how best to layout the table.
The bases are the metal desk bases from Ikea - $10 each. Some of the wood was left over from the bathroom mirror project and then I bought a few more boards to complete it. I also used a precut 24x48 MDF board. Starting with the dimensions of the MDF board, I drew up a plan with how best to layout the table.
1. I began with cutting the four outside pieces that would frame the table. Initially I mitered the corners to create the most finished look. However, I don't have all the tools necessary to join those miters...so I resorted to just butting the ends and using a Kreg Jig to a join the pieces with a pocket hole system.

2. Using scrap wood I cut a small piece of wood for each of the four sides to act as a brace for the MDF top. These pieces were attached via wood glue and screws to the inside of the frame and the underside of the MDF. To measure the right location and size of the wood for the bracing I placed wood scraps on the floor to represent the wood inset, then placed the MDF on top of those, measured the height required, cut wood for bracing, then attached the bracing to the inside of the frame. The MDF sub-top was then screwed into the bracing. I recommend two on each short side and three on each long side.
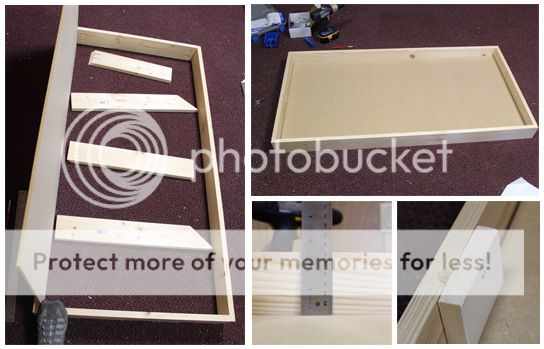
3. Initially I was simple going to attach the Ikea legs to the underside of the MDF; however I did not like the height of the table. Therefore I gained a couple inches by adding additional boards under the MDF for the legs to go into. I used the Kreg Jig to join to the inside of the frame.

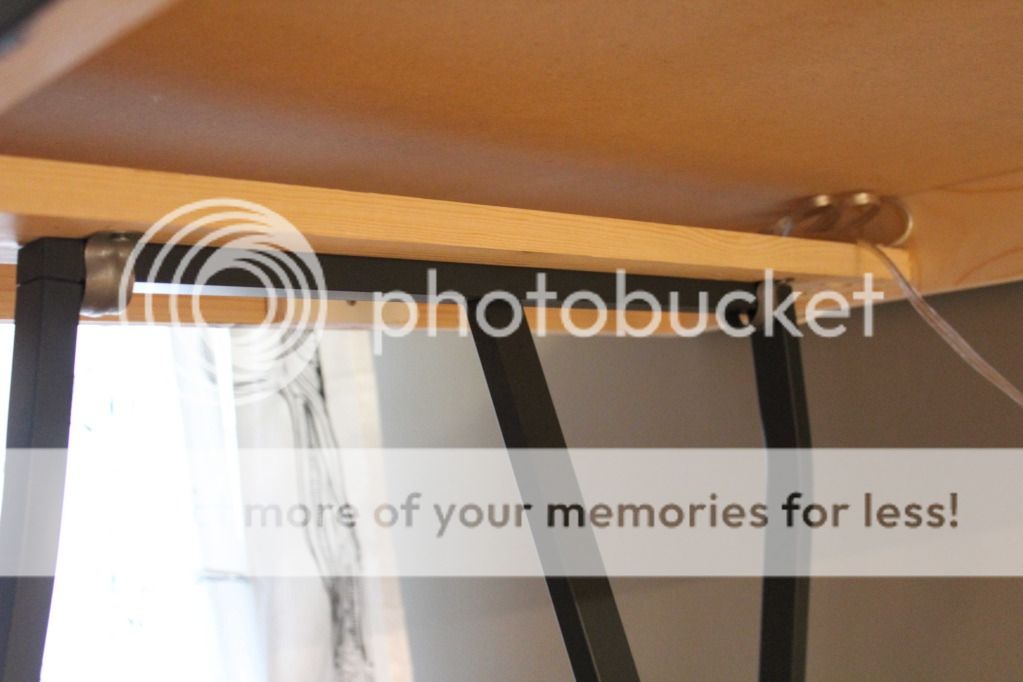
4. I had assumed there would be mounting hardware with the legs like I received with some of the other Ikea desk leg types. However, that was not the case. My mom suggested rifling through the plumbing aisle at Home Depot for the U brackets that are typically used to attach pipe to walls. It is the perfect solution. I attached two on the inside of the cross braces on the legs. If you attach them right up to vertical legs on each side then front to back movement will not occur. There is still the possibility of the legs moving side to side - and therefore could collapse the table. Use a line of Liquid Nails along the top the leg to attach to the wood board for a more secure hold. Another benefit of these cross braces - my lamp cords tuck right in!
Now for my inset top. I was concerned I would never be able to master this, but it is actual quite easy.
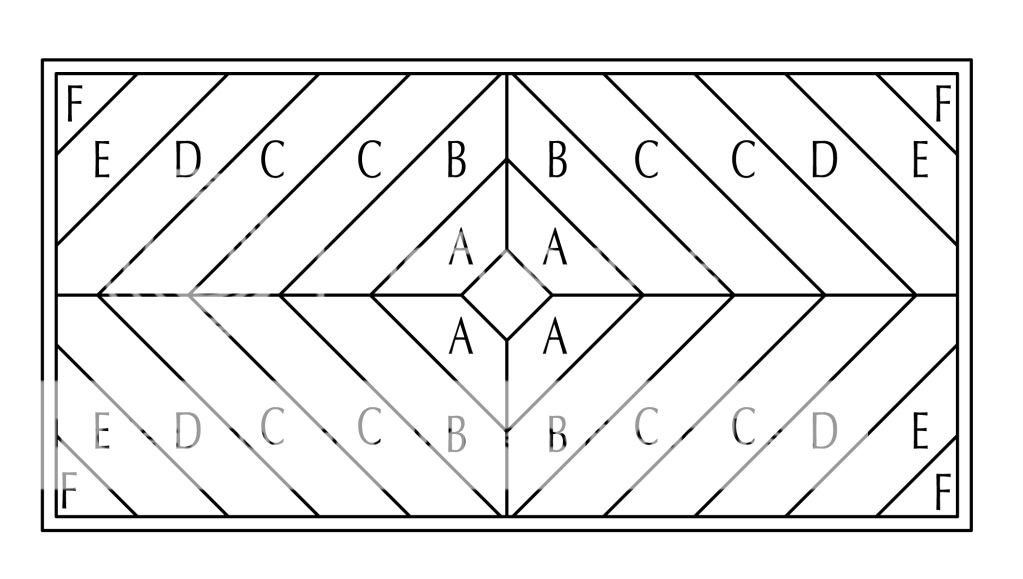 |
| Drawing of Inset Layout |
5. I started with a 3-1/2" x 3-1/2" center square. {If you are not using scrap pieces than you can calculate the best way to cut to minimize waste - or message me and I'll send you the drawing using 8 foot boards.}
6. The second piece from the center will share the 3-1/2" dimension on the inside of the piece and then use 45 degree cuts out from there.
7. The next piece will be similar - use the long dimension from the second piece as the starting point, and then miter out from there. After a few pieces you will then begin to decrease the dimension as you work into the corner.
8. In the end you have 4 of every cut type {other than your center} since the pattern is the same - just mirrored - in each of the four quadrants of the table.
Now onto staining...well, first lots of sanding - my right arm is a little sore from all that. Perhaps the next tool will need to be a sander? {Added to the Birthday/Christmas list.}
9. Sanding makes or breaks your success with staining. It is the most painful part of the process if you do it by hand, but it is worth all the grueling work. Start with coarse sand paper and then work your way down to a fine grit. Use these handy dandy tools to make the job a little easier - or just buy a sander.
10. If you are looking for a refined look, than you will need to fill all the holes. I am not going for that look, so I skipped that step. Be sure to use a wood filler than is stainable; they even make precolored filler, but I've never tried that kind.
11. After sanding be sure to use tack cloth to remove the saw dust. A standard cloth, even a wet cloth, is not going to do the amazing job of this cheap little item from the hardware store.
12. Prestain conditioner {there are conditioners for water based stain and for oil based, so use the one that coordinates with the stain you will be using. FYI: the one on the link has a potent odor.} Sure many of the stains out there claim that you can skip the conditioner, but I'm not so sure about that. Find a few scrap pieces of wood and compare with and without to determine the look that is best for your project. Also, don't judge based on the first few minutes after the trial - come back in an hour with fresh eyes to see the true difference. Follow the simple directions on the back of the can for how to condition your wood. You will need to be ready to stain about an hour after conditioning.
13. We are finally to the part with the color! Now that you have tried and tested on scrap wood you have your technique down right? If it's your first time, then you are probably terrified, but that's normal. Staining is a process that takes a little finesse. I prefer using old rags than a brush, and I do a quick rub on and then build up the depth as I go. Sure it takes more time and multiple coats, but I feel like I have more control over the end result by doing it this way.
14. So you're done now right? NO! You still need to apply a top coat - a protector coat - to the wood after your stain has dried. Typical you can use polyurethane . There are several different finishes available - think of it like paint. With paint you have flat, eggshell, satin, semi-gloss and high-gloss. You have the same control over the sheen with your top coat for stained surfaces as well. I prefer satin for my wood stain {and for my door paint}, but do what works with your aesthetic. Just remember, the higher the gloss the more noticeable the imperfections.


Linking Up To:
 DIY Project Parade - Saturday
Home Stories A2Z - Monday
Miss Mustard See - Furniture Feature Friday
TT&J Weekend Wrap up Party - Friday
Home Stories A2Z - Monday
Miss Mustard See - Furniture Feature Friday
TT&J Weekend Wrap up Party - Friday

Wow Renee...this is awesome! Wanna come over and make me one?? Haha. Though now you have given me some thoughts on my guestroom nightstand with those legs.
ReplyDeleteI also love that piece of art...have the same piece from Kalisher in my guestroom :) And, I don't think you need bigger lampshades.
Can't wait to see your next project!
Thanks! Definitely check out the Ikea office section and all their leg styles - lots of good options. I really wanted the fabulous hairpin legs from hairpinlegs.com, but at $20 per leg that's $80 just for legs!! {I can always switch them out later.}
DeleteAWESOME! I love this project! Thanks for the great detailed step by step. I'm pinning this for later! I love Chevron and the paint colors you used! Where did you get the great little round table next to the couch? Love that too!
ReplyDeleteThanks Chessa. That wonderful little round table is from West Elm, and it's one of my favorites!
DeleteBeautiful table, Renee! Wow, you really put a lot of thought and work into this! I'm very impressed!
ReplyDeleteIncredible!!
ReplyDeleteOh wow, Renee! It's gorgeous! I'm including a link back in tomorrow's highlights! Thanks so much for sharing your hard work and creativity. I love it!
ReplyDeleteThank you SO much Roeshel for hosting the project parade, and for commenting!
ReplyDeleteGreat job. What were the stain colors you used? I'm doing a bench for my bedroom and would love to replicate your colors. Thanks
ReplyDeleteI used Varathane brand in Ebony, Weathered Gray, and Whitewash. I mixed them (randomly - trial and error) to create the two lighter grays.
DeleteI love love love this. Pinning now!
ReplyDeleteBeautiful craftmanship! I want to make something like this but a smaller scale. I was wondering how you calculated the size of your cuts?
ReplyDeleteHi Rachel. I actually used a computer program (AutoCAD) to draw the table and determine the size of each piece. If you have a scale (architectural ruler) then you could draw what you want by hand and determine sizes that way. I'd recommend cutting the center piece first and then remeasure each piece as you work your way out to determine the size of the next cut.
DeleteHi Renee!
ReplyDeleteYou are a woman after my own heart! I came here looking for the information on how to do the bedside tables and found this table! It is amazing! I can't wait to make one myself. Would you mind emailing me the drawing using 8 foot boards? I would so appreciate it!
christina.kounlavong@gmail.com
Thank you!
Christina